CB245 CCD Camera stuff
These show my interpretation of enclosures and interconnection
of the cookbook camera. The cabling certainly looks better than
that suggested in the book and it works well.
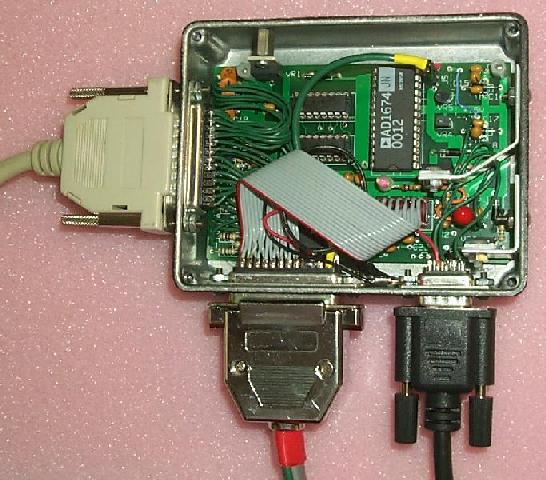
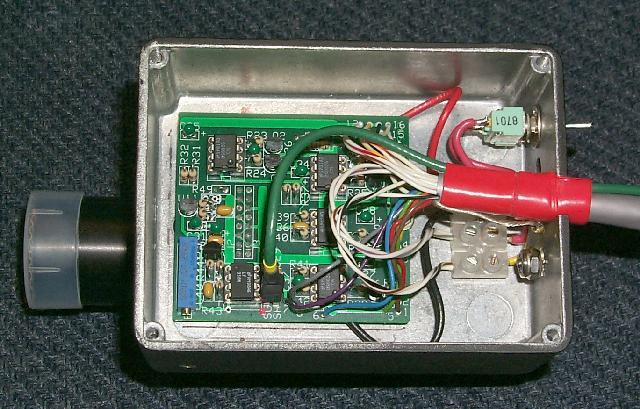
A/D board in a Hammond #1590BB cast aluminum enclosure
All of the signals to the camera preamp board go thru the DB-25
connector at bottom left. The D9 at bottom right is the power
supply connector, and the PC printer port connects on the left.
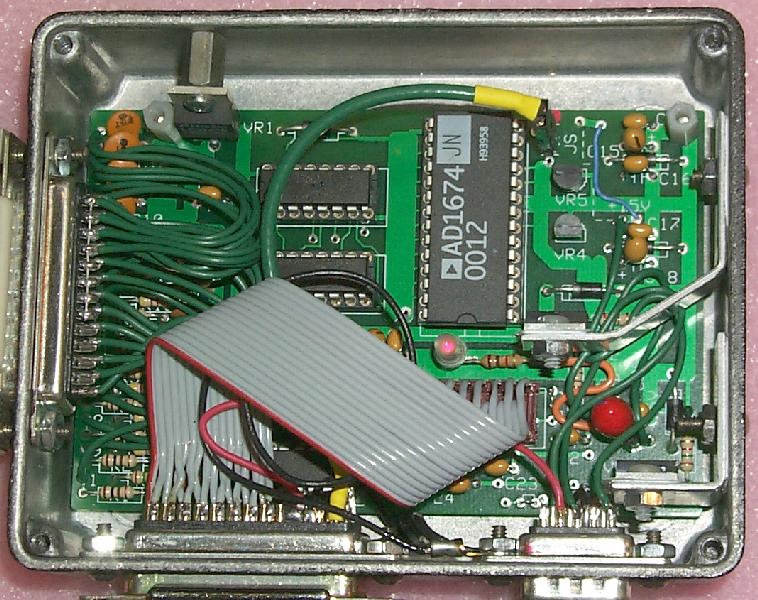
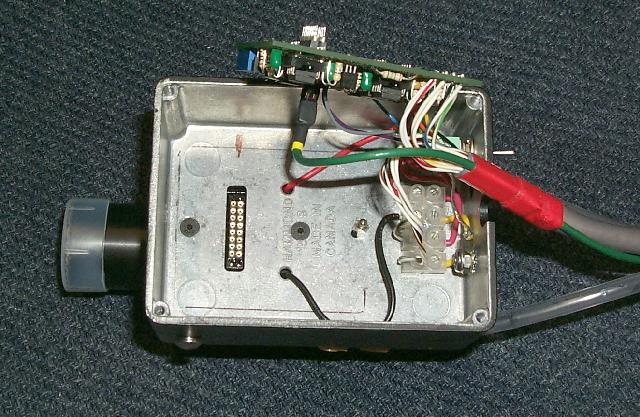
A/D board closer up
The three TO-220 voltage regulators are all heat sinked to the
enclosure, which cools them but warms the box up. In an insulation
blanket, the box will warm up to about 115F. The regulators get up
to about 125F. At 72F ambient, the box gets up to about 90F. The
red LED runs from +15V, will eventually shine thru a window in the lid.
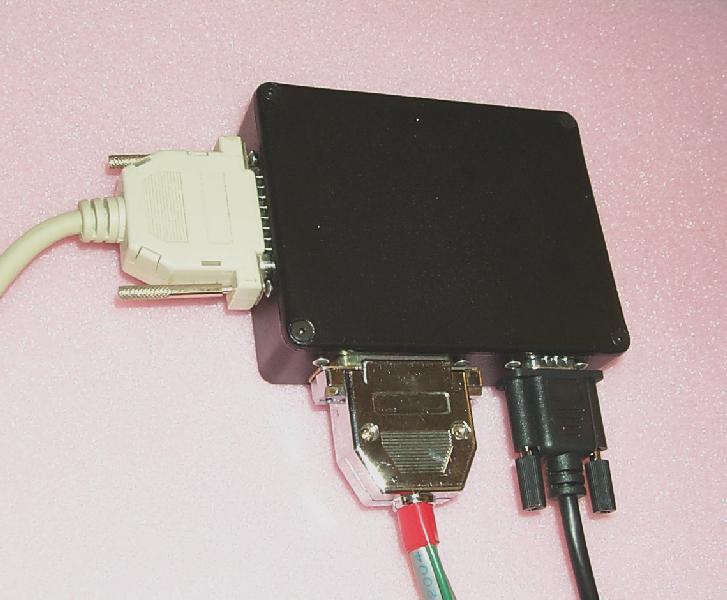
A/D board closed
Such a pretty box, weather resistant, no air leaks. Hopefully a big
heatsink isn't going to be required! The analog video signal runs thru
the green 75 ohm coax along side the signal cable to the preamp.
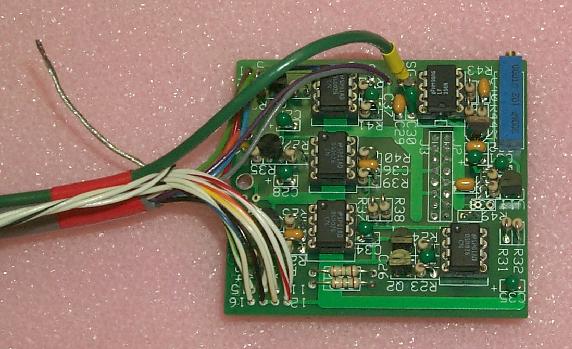
Preamp board
The 20 conductor shielded cable and coax exit to the left.
(The shield and peltier power leads are hanging loose.)
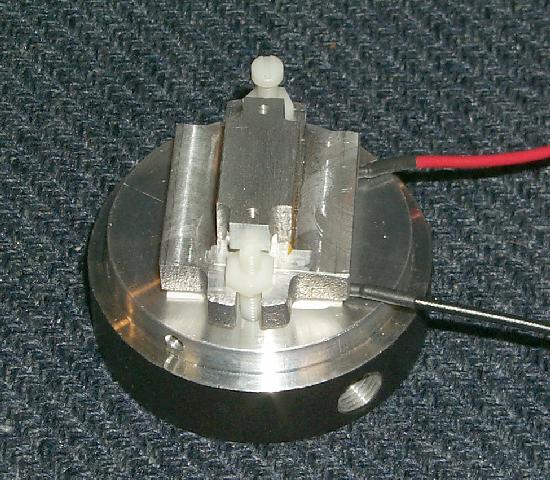
Cold Finger
I had to deepen the screw notch on the near side in order to
get the CCD centered in the window. I also narrowed the finger
a bit to allow room for the CCD sockets. One of the cold finger
mounting holes was drilled thru into the water area, so I 'sealed'
it with epoxy. Scary.
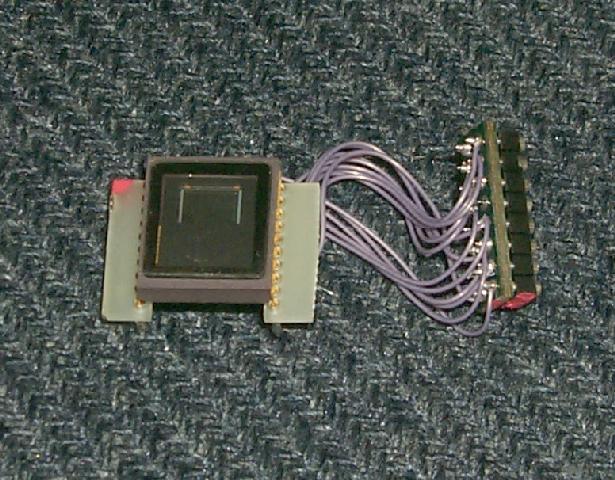
Socketed CCD
The socket halves are from a CCD socket cut in half. I left
the extra material to handle when servicing the assembly.
There is an extra J2/J3 plug here, this assembly plugs onto
the socket that is glued into the camera housing.
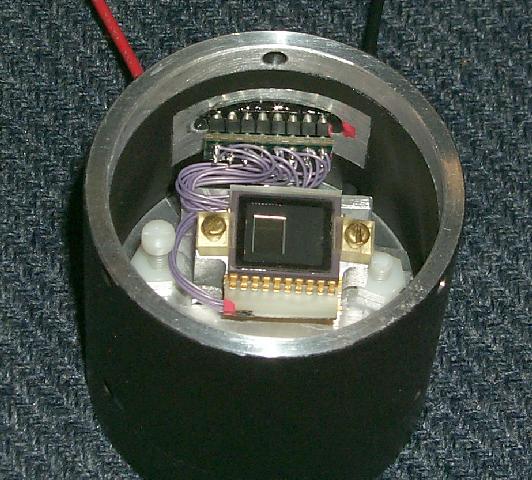
CCD in housing
The 2X8 J2/J3 plug can be pulled and the CCD socket assembly
lifted out of the housing. Murphy's Law guarantees that if it
is servicable, it will never require service.
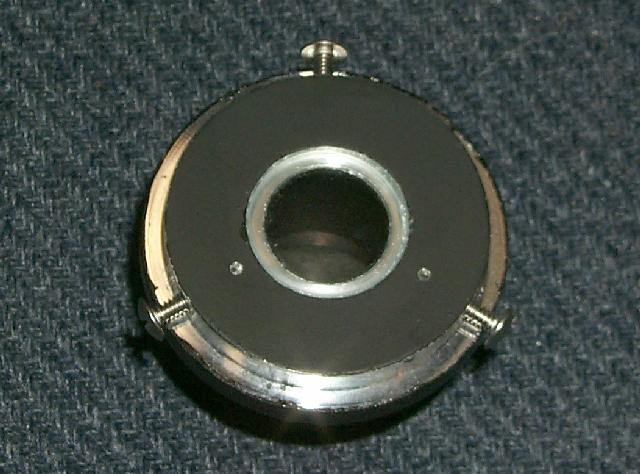
Front cover and window, purge holes
The OU supplied window is RTV'd into the front piece.
Note the two small holes drilled to intercept two of the 6-32 tapped
mounting holes. These are to allow purging the CCD chamber with dry gas.
[Unproven theory alert!]
The two screws can be removed, gas is introduced thru one screw hole,
the atmosphere inside the chamber escapes thru the other screw hole.
Purge for exactly some amount of time or volume at some low flow rate
and some exact temperature, and then remove the purge gear and replace
the screws. The purge needs to be slow enough to not blow out the
'sealing' of the front and back sections of the CCD head, or the window,
but enough volume to replace the atmosphere inside the chamber with
frendly, dry gas. I hear that argon is better, CO2 is OK and more
available, nitrogen is nice too.
[END Unproven theory alert]
My motivation for drilling the purge holes is due to two sessions
on the scope with a frosted CCD. The head has been closed up in an
air conditioned area, but the central Texas humdity apparently has
control. I have CO2 welding gas and good filtering available, so what
the heck? I also have new dessicant packs available, but I am scared
to put a little bag of 'unknown chemicals' inside the camera housing.
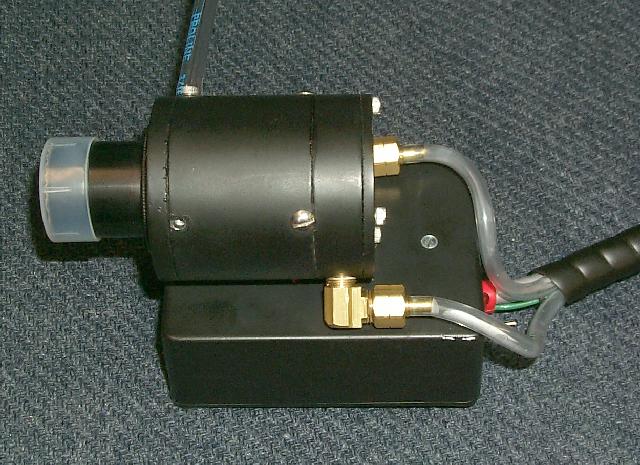
Preamp board in Hammond #1590S cast aluminum enclosure
The switch is peltier power on/off, and the terminal block for the
peltier wiring is for servicability. (I used double conductors for
the peltier power supply.) I have taken this thing apart about 200
times just fitting everything, so desoldering things is out. The cable
shield is grounded to the box. I hope to eventually find a slightly
smaller box for the preamp. (Or do I?)
Preamp box mounting
The two black countersink head allen screws mount the box to the
camera head. The 4-40 stud goes thru the mounting hole in the preamp
board.
Camera head assembly
It got big! My buddy suggested I may need a license for this thing.
Put a handle on it and you won't make it thru the airport baggage check.
The cast aluminum enclosure definately adds some weight above the OU
supplied preamp cover.

Camera head again
Time to start looking for a slightly smaller encosure for the head,
but this may stand up to some abuse. The screw on the side is removed
to access P1 for adjustment. I had to grind an angle off of the sides
of the water fittings to allow everything to fit.

Gas purge gear
The gas purge hose slips over the head of a screw that is drilled thru with
a .050" hole. With the other cover screw removed, purge gas (CO2 welding gas
in this case) is flowed thru the CCD housing to try to remove any moisture and
replace the atmosphere (Ahhhhh, the atmosphere) with dry gas. Mr. heat gun has
been known to warm the head before/during purging.
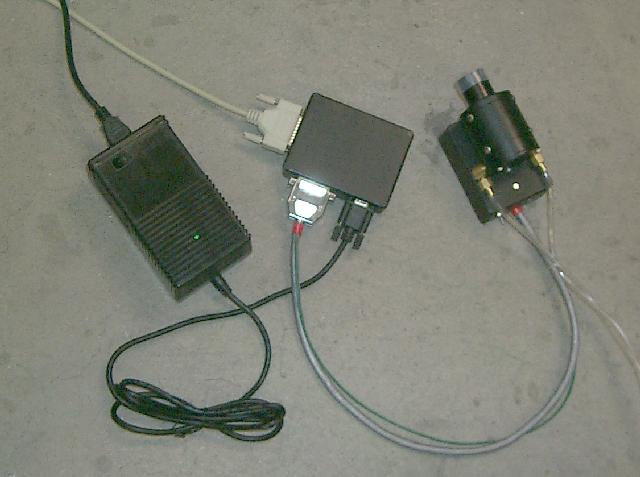
The whole thang
The power supply is a commercial linear unit with +/-15V @ 250 mA regualated,
+5V regulated @ 500 mA, and 6.5V @2A unregulated for the cooler. If everything
works as is, I will modify the A/D board to use the +5V instead of deriving it
from the +15V supply. The 6.5V cooler supply may not be enough zoots, but it
sure cools/heats things. Measurements to follow... Mr. garden hose is the
current cooling water supply. Not very portable therefore...
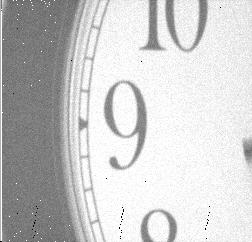
CB245 first light!
3:00 AM, Short tube 80 in the shop 20 ft from the clock, illuminated
by a small light across the room.
Cooling off, 0.1 sec exposure. Prime focus thru mirror diagonal.
Noisy, wierd stripes in image. Out of beer. Sleepy time!
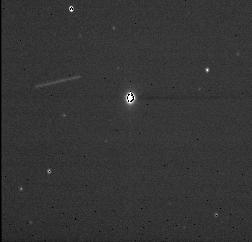
CB245 first astro light!
Short tube 80, apparently frosted CCD, nothing would focus well.
Two second exposure at polaris. The streak must be a satellite.
Not much to look at, but I got a thrill out of it!
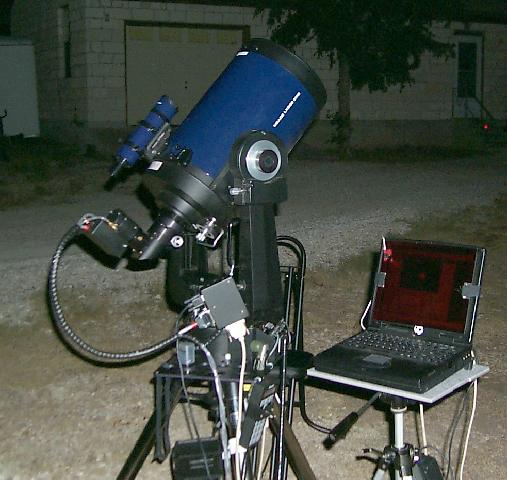
Things are looking up...
This is the whole wad-O-stuff(R) in the image acquisition mode.
Not shown are the grey hairs, kilobeers and wallet-suckage invested
to get to this point. Sleep? We don't need no stinkin sleep!
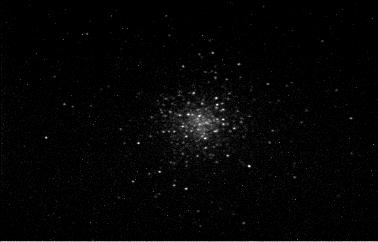
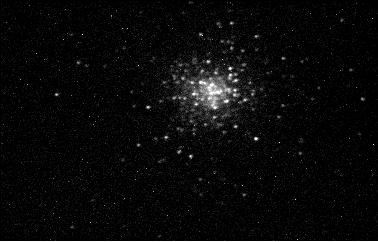
CB245 first astro images!
M2, prime focus on LX200 10" f10 alt/az, 10 second exposure 8/8/00.
WIN245 acquisition, tweaked with Iris, with no real idea how to
drive this software. (Must...register...software...Thanks!!!)
I see the WIN245 flat and dark field stuff, wonder how it works?
Giant mud puddle in yard from garden hose cooling. Definately
hooked! Out of beer...
M2, prime focus on LX200 10" f10 alt/az, 30 second exposure 8/8/00.
WIN245 acquisition, tweaked with Iris, still clueless how to
process images, but I can keep the cat away from the cables for
several minutes at a time. Not sure if image streaking is from
wind gusts or alt/az at 30 seconds. A wedge must be needed!
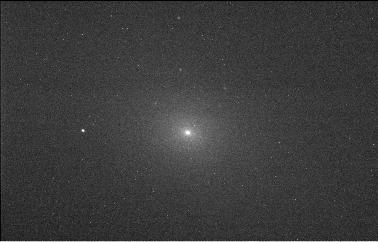
M110, prime focus on LX200 10" f10 alt/az, 10 second exposure 8/8/00.
WIN245 acquisition, tweaked with Iris
Final assembly preliminary summation:
The camera head weighs over 7 oz more than the OU supplied preamp enclosure
would have. It is also certainly more 'weather resistant' than the original
design.
The weight of the camera head and shielded cable definately effects
balance of the LX200, but it is tolerable.
The 20 conductor cable is stiffer than the bundle of ribbon cables would be.
I made it 6" longer than the book suggested for the ribbon cables, but I
recently read that it could be much longer. I am sure that a shielded cable
must be 'better' than ribbin cable, but only use will tell.
Oscilloscope examination and imaging shows that signals look good, I think
the 20 conductor cable (and video coax) could be easily twice as long without
significant signal degradation. The extra length is needed.
More to come...
Color pix taken with a Kodak DC-260Z